The compact, robust measuring head with special flash illumination is custom adapted to the production process
Fraunhofer IPM has developed an inline inspection system that fully examines the wire surface at feeding rates of up to 30 m per second, thus detecting and classifying defects in real-time
During cold forming of wire, a blank is drawn in several stages through tapered apertures at feeding rates of 10 m per second and faster. The drawing dies used for this are subject to severe wear and can therefore damage the wire’s surface. Typical defects are draw marks, cross grooves and chatter marks with structure sizes ranging from several millimeters down to 50μm and less. Common image processing systems fail to detect these micro-defects reliably when inspecting fast-moving wire surfaces. With WIRE-HR, Fraunhofer IPM offers an inline inspection system that fully examines the wire surface at feeding rates of up to 30 m per second, thus detecting and classifying defects in real-time. A particular new feature of the WIRE-HR system is the possibility to detect
periodical defects – as caused for example by transportation rolls. This was achieved by a combination of FPGA implemented image processing and especially adapted, extremely powerful LED flashes. The system reliably detects even point defects with a size of 50μm.

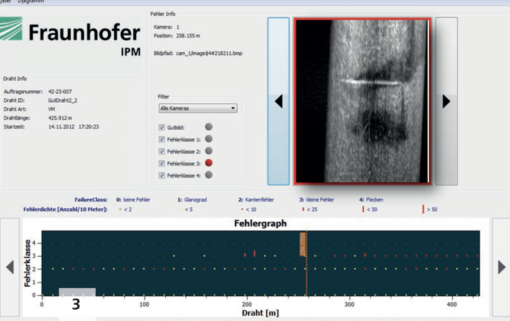
The software documents surface inspection as wires are being drawn. Defects can later be examined with the »viewer« that is included
Recognize, classify and document defects
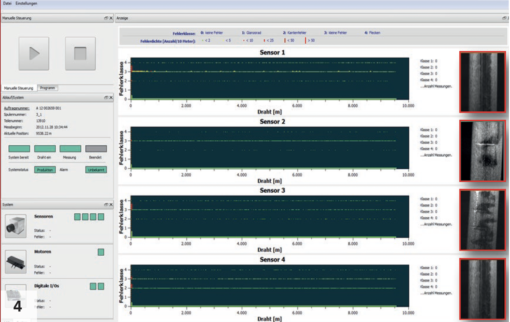
WIRE-HR quickly and reliably recognizes surface defects such as draw marks, cross grooves, chatter marks and special periodic defects in real-time. The system classifies the defects and transmits them to a data base together with information on the wire position measured by an encoder. The wire is inserted easily into the robust, production capable sensor housing by a conical »trumpet«. The graphical user interface provides an overview of all relevant information about the state of the drawing process and the surface quality of the wire. Specific defect classes can be linked by the user to extra output channels, e.g. to turn on a warning light or even to stop production. In addition, WIRE-HR provides comfortable means for documentation of measurement results by defect classes, defect positions and images of the wire surface. WIRE-HR is delivered with a complete CE documentation.

The measurement program’s graphical user interface with a live image of current production.
Individual adjustment
The correct lighting is crucial for processing images from moving objects. Two-channel LED dark field illumination for each camera shortens exposure time to below 5 μs. This creates a still image of the fast-moving wire, so that an optical resolution below 30 μm is achieved over a measurement field width of 12 mm – even in the direction of movement. The system can be adapted to various customerspecific measuring tasks such as larger wire diameters or special geometries.
Real-time processing
In contrast to other test methods for wire production, such as eddy current or stray light testing, WIRE-HR acquires images of the complete wire surface. This proves to be an enormous advantage for defect documentation and analysis. The key components are customizable FPGAs for real-time image processing of up to six cameras. At a resolution of 640 x 480 pixels, the data throughput is 6 GBit/s. The WIRE-HR technology solves a number of inspection tasks that cannot be handled by existing image processing systems, in particular when fast moving surfaces have to be inspected with a high resolution. Such cutting-edge image processing applications require that both, algorithms and hardware be very precisely adapted to the specific task.
Advantages of WIRE-HR
100% inline inspection of the wire surface
feeding rate of up to 30 m per second
(min.defect size 50 μm)
inspection of round and rectangular wires
inspection of wires with various degree of gloss
system adjustable to diameter and edge length (diameter of up to 12 mm, rectangular wires up to 20 x 5 mm²)
© Fraunhofer IPM 04/2016 Photos: Fraunhofer IPM


